Web Page Layout #3
Note: This web page teaches an outdated method of structuring web pages.
You can create a website template using the code at the bottom of this page. You can also use the code from the example web page which demonstrates how to add borders, background colors, links and images.
Layout #3
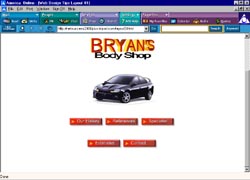
 The web page here is constructed using 3 single row single cell tables. A fourth could be added for the footer.
You can get the code from the example by right clicking on the web page and choosing view source (IE) or View Page Source (Mozilla).
Example Web Page: Layout #3
Add your logo to table 1
Add image and body text to table 2. See Paragraphs and Images.
Add navigation to table 3
Add fourth table for footer if needed.
Copy the code and save it.
To copy the code, just drag your mouse over it while holding down the left mouse button. Right click on the highlighted text and choose copy.
Open NotePad and right click inside the editor window. Choose Paste.
The code:
<html>

<head>

<title>Page title</title>

<style type="text/css">

h1 {font-family:arial; font-size:16pt;text-align:center}

p {font-family:arial; font-size:12pt;text-align:left}

</style>

</head>

<body>

<!--TABLE 1-->

<table width="100%" cellpadding="0" cellspacing="0">

<tr align="center" valign="top">

<td align="center" colspan="1" rowspan="1">LOGO</td>

</tr></table>

<!--TABLE 2-->

<table width="100%" cellpadding="0" cellspacing="0">

<tr align="center" valign="top">

<td align="center" colspan="1" rowspan="1">IMAGE AND BODY TEXT</td>

</tr></table>

<!--TABLE 3-->

<table width="100%" cellpadding="0" cellspacing="0">

<tr align="center" valign="top">

<td align="center" colspan="1" rowspan="1">NAVIGATION</td>

</tr></table>


</body>

</html>
You can get your logo made free at our Web Graphics Gallery.
Get your navigational buttons at our Button Gallery or go to Creating Buttons With CSS